How to Get Started With GraphQL
GraphQL, a powerful query language revolutionized the way you query and manipulate data through your APIs. It provides a type system that you can use to define a schema, which describes what data is available from your API. The client can explore this schema, and request only the data that they need.
Why GraphQL over REST?
This is fundamentally different from how traditional REST APIs work, where you have multiple endpoints to request a set of data. In a GraphQL world, you only have one endpoint, and the request defines what data you need.
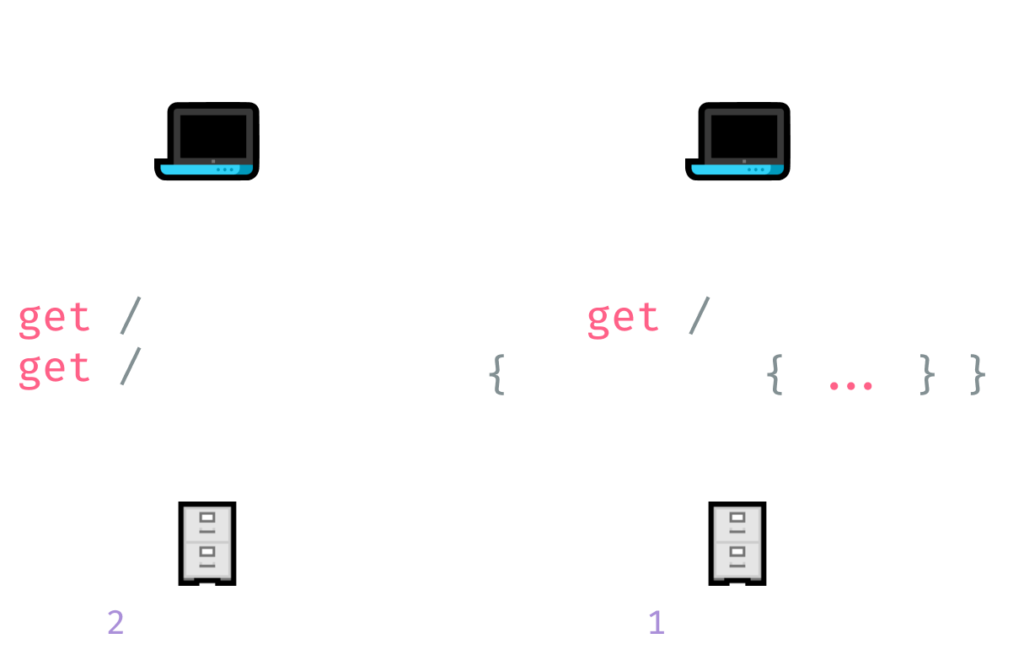
This solves two performance problems that are common issues with REST APIs. They are called under, and over-fetching. Imagine you need data about the list of available articles on your site, and you also need all categories. In REST, you would make two separate calls to request this. One to the /articles endpoint, and one to the /categories endpoint. This creates unnecessary HTTP requests, you have two instead of one because one request is not enough. This is call under-fetching.
Let’s change things around and say you need a single article this time. You initiate a request to the /article endpoint, and you get back all the information associate with an article. But you only care about a title, an excerpt, and a link. This creates over-fetching. You end up with more data than you actually need, which makes you use more bandwidth than you should.
How GraphQL works?
As pointed out in the beginning, GraphQL works by describing your data through its type system. Let’s say you want to make the frontend application able to query for articles. For this, you can define a new type that defines the available information:
type Query {
    articles: {
        id: Int,
        title: String,
        category: Int
    }
}As you can see, GraphQL is heavily typed. This lets you easily avoid type-related bugs, and print useful, descriptive error messages to users who don’t use your API correctly. By default, GraphQL support the following types: String, Int, Float, Boolean, ID, but you can also define your very own types using the type keyword.
Based on this schema, the frontend can ask for the data they need, in the following format:
{
   articles {
       title
   }
}This request only specifies that a title is needed for the articles. The API based on this request can respond with a result that has the same structure in JSON format:
{
    "data": {
        "articles": [
            {
                "title": "10 Best Practices for HTML"
            },
            {
                "title": "How to Get Started With GraphQL"
            }
        ]
    }
}Setting Up the Project
To get started with GraphQL, let’s build a simple API in Express that can serve articles and categories associated with these articles. First, we want to create the base for the express server. To start out, create a new project and after running npm init -y, install the following dependencies:
npm i express graphql express-graphql
Apart from Express and GraphQL itself, you will also need the express-graphql package that will glue the two together. Also make sure you install nodemon, as a dev dependency. This will help us automatically reload the API when we make changes to it. Once everything installed, change your start script to the following in your package.json:
"scripts": {
    "start": "nodemon server.js"
}This will use nodemon to start the server using server.js, so as a next step, create that file at the root of your project. I will be also using import statements throughout the project. In order to enable them, you want to add the following to your package.json:
"type": "module"Using buildSchema to create the schema
Let’s change server.js around a bit, and see how you can create and run a simple Express GraphQL server, using the official tutorial of GraphQL:
var express = require('express');
var { graphqlHTTP } = require('express-graphql');
var { buildSchema } = require('graphql');

var schema = buildSchema(`
    type Query {
        hello: String
    }
`);

var root = {
    hello: () => {
        return 'Hello world!';
    },
};

var app = express();
app.use('/graphql', graphqlHTTP({
    schema: schema,
    rootValue: root,
    graphiql: true,
}));
app.listen(4000);
console.log('Running a GraphQL API server at http://localhost:4000/graphql');At the top, we start off by importing the necessary functions along with Express itself. The buildSchema function can be used to create a GraphQLSchema object. It uses the Schema Definition Language, or SDL for short. It describes the schema as a string.
You can see that we have a Query type, that has a single property, called hello. It is a string type. We also have a root variable, that has the same signature, as the schema itself. The function inside this object is called a resolver. It tells GraphQL, what should be the resolved value when the hello node is requested. All of this can be put together using the graphqlHTTP function. You can see that it also sets graphiql to true. This provides a graphical user interface for executing queries. If you run npm run start now, and head over to your localhost, you will be presented with the following:
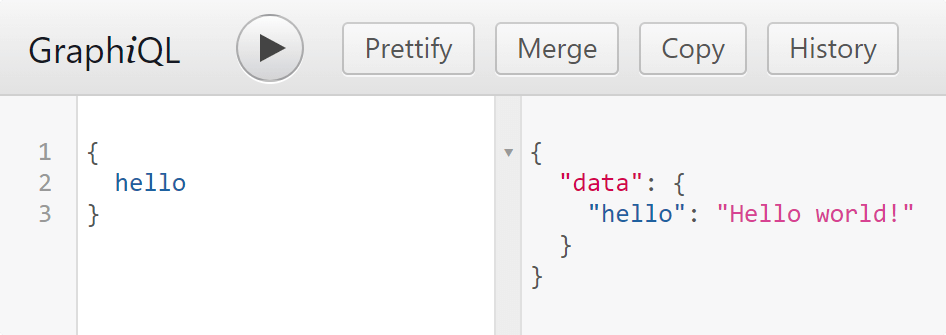
http://localhost:4000/graphql and request the hello node.If you try to request hello, you will get back “Hello world!”. You’ve just created a very basic GraphQL API using Express! 🎉 But we are not done yet, let’s see how you can use a GraphQLSchema object to create the same thing.
Using GraphQLSchema to create the schema
Remove everything from your server.js and add the following instead:
var express = require('express');
var { graphqlHTTP } = require('express-graphql');
const { GraphQLSchema, GraphQLObjectType, GraphQLString } = require('graphql');

const schema = new GraphQLSchema({
    query: new GraphQLObjectType({
        name: 'Query',
        fields: () => ({
            hello: {
                type: GraphQLString,
                resolve: () => '🎉'
            }
        })
    })
});

var app = express();
app.use('/graphql', graphqlHTTP({
    schema: schema,
    graphiql: true,
}));
app.listen(4000);
console.log('Running a GraphQL API server at http://localhost:4000/graphql');We’ve removed the SDL string, and instead, we are using built-in objects such as GraphQLSchema and GraphQLString. If you rerun the query in graphiql, you will get the same result, except this time, a confetti is returned. You will also notice, we don’t need a rootValue inside graphqlHTTP, because we’ve already defined the resolver, right next to the type of the field.
The differences between buildSchema vs GraphQLSchema
So what is the difference between buildSchema and graphQLSchema? Seems like using buildSchema is much more simpler, than doing it the other way. What are the differences?
Basically, when you use buildSchema, you also get back a graphQLSchema object. Given that you get the same output with both solutions — if you define the same schema — there’s no performance difference between the two. However, if you take it into account that buildSchema also needs to parse the SDL, the startup time is slower than using graphQlSchema objects.
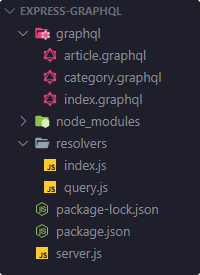
However, there are other limitations as well. Does that mean that you should be using GraphQLSchema instead of buildSchema? The answer is no. There’s a third way that lets you write your schema in SDL, and separate out your resolvers as well. Enter the world of graphql-tools. We want a project structure, something similar to this, where everything is nicely separated:

Writing Your Very First Types
To get more familiar with the Schema Definition Language, create an index.graphql file in your project, under a graphql folder. Make sure you have the GraphQL extension installed in VSCode to get syntax highlight. In your index file, create a Query type that will list all the available fields in your API:
type Article {
    id: Int
    title: String
    category: Int
}

type Category {
    id: Int
    name: String
}

type Query {
    """Get a list of articles"""
    articles(categoryId: Int): [Article]
    article(id: Int!): Article
    categories: [Category]
    category(id: Int!): Category
}You can see we have introduced three different types. One for an article, one for a category (that you can reuse many times), and one for a query that we can use to query either multiple articles, a single article, or categories. To tell GraphQL we want to return these types — in either arrays or as a single object — we can pass them down to the Query type. Also note we can have arguments for a given field, using parentheses. By also appending an exclamation mark after the type, you can specify that the parameter is mandatory. For example, the article fields also requires and id.
You also have the ability to add a description to your fields using triple quotes. This will be shown in the documentation of graphiql.
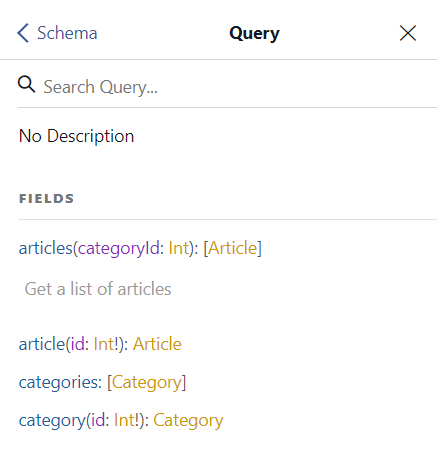
It would be insane, however, to write every type in one single file. You can already see it will quickly become unmanageable. Instead, separate the article and category type out to different files. Lucikly for us, graphql-tools supports the use of the #import expression. Replace the two types with these import statements at the top of your index file:
#import './article.graphql'
#import './category.graphql'And now we have the schema ready for us to query. But we don’t have any resolvers that would tell us what to return for them.
Creating Resolvers
For this, create a new folder called resolvers and add an index.js file that can export all available resolvers. Because of the scope of this tutorial, right now we only have one for the Query:
So what is inside query.js? Well, it simply exports an object with the same signature that we defined for our Query type:
export default {
    articles: () => null,
    article: () => null,
    categories: () => null,
    category: () => null
}All resolvers currently return null. This is also the default behavior if you are missing a resolver for a field. This is where you would query your database and return the relevant values. For the sake of simplicity, I’m using the following objects as a placeholder for the database. This is what we will query:
const categories = [
    { id: 0, name: 'HTML' },
    { id: 1, name: 'CSS' },
    { id: 2, name: 'JavaScript' }
];

const articles = [
    { id: 0, title: '10 Best Practices for HTML', category: 1 },
    { id: 1, title: 'How to Get Started With GraphQL', category: 3 },
    { id: 2, title: 'How to Use Express to Build a REST API', category: 3 },
    { id: 3, title: 'How to Create Skeleton Loaders in CSS', category: 2 },
    { id: 4, title: 'What are Tuples and Records in JavaScript?', category: 3 }
];We have 5 different articles, each with an id, a title and a category. We also have three different categories, each with an id and a name.
So what goes inside the function? Well, for the articles and categories, we have a relatively easy job, we just need to return the correct array:
export default {
    articles: () => articles
    categories: () => categories
}But what if we want to provide a way for the client to also filter articles based on the id of a category? Remember that inside the schema, we’ve said that the API can accept a categoryId as an argument:
type Query {
    articles(categoryId: Int): [Article]
    ...
}We can also access this argument inside the resolver, as each callback function can take in four different arguments. The second argument is what we are looking for, that holds the arguments passed to the query. So we can change the implementation to the following:
articles: (obj, args) => {
    if (args.categoryId) {
        return articles.filter(article => article.category === args.categoryId);
    }

    return articles;
},This says that if a categoryId has been provided as an argument, it will filter the articles array for that categoryId. Otherwise, it will return the whole array.
We can do the same for the single article, and single category fields, using the find method. This leaves us with:
export default {
    articles: (obj, args) => {
        if (args.categoryId) {
            return articles.filter(article => article.category === args.categoryId);
        }

        return articles;
    },
    article: (obj, args) => articles.find(article => article.id === args.id),
    categories: () => categories,
    category: (obj, args) => categories.find(category => category.id === args.id)
}Connecting Everything Together
All that is left to do is to connect these pieces together and test out the API. Go back to your server.js file and replace the previous implementation to instead use graphql-tools:
import express from 'express';
import { graphqlHTTP } from 'express-graphql'

import { loadSchemaSync } from '@graphql-tools/load'
import { GraphQLFileLoader } from '@graphql-tools/graphql-file-loader'
import { addResolversToSchema } from '@graphql-tools/schema'

import resolvers from './resolvers/index.js';

const typeDefs = loadSchemaSync('./graphql/index.graphql', {
    loaders: [new GraphQLFileLoader()]
});

const schema = addResolversToSchema({
    schema: typeDefs,
    resolvers,
});

const app = express();

app.use('/graphql', graphqlHTTP({
    schema,
    graphiql: true,
}));

app.listen(3000);

console.log('Server listening on http://localhost:3000');The package provides a bunch of functions for making our lives easier. It provides a loader that can be used to load .graphql files, so we have our type definitions, as well as a function for adding the imported resolvers to the schema. For other ways of loading .graphql files, you can refer to the docs of graphql-tools. And again, this is passed to graphqlHTTP just as before. Note that I’ve also changed the path to /graphql, so this is where we will be able to access the API. And that is all this file does:
- Imports the type definitions
- Imports the resolvers for the type definitions
- Combines them together into a schema that GraphQL can use
Testing the API in Postman
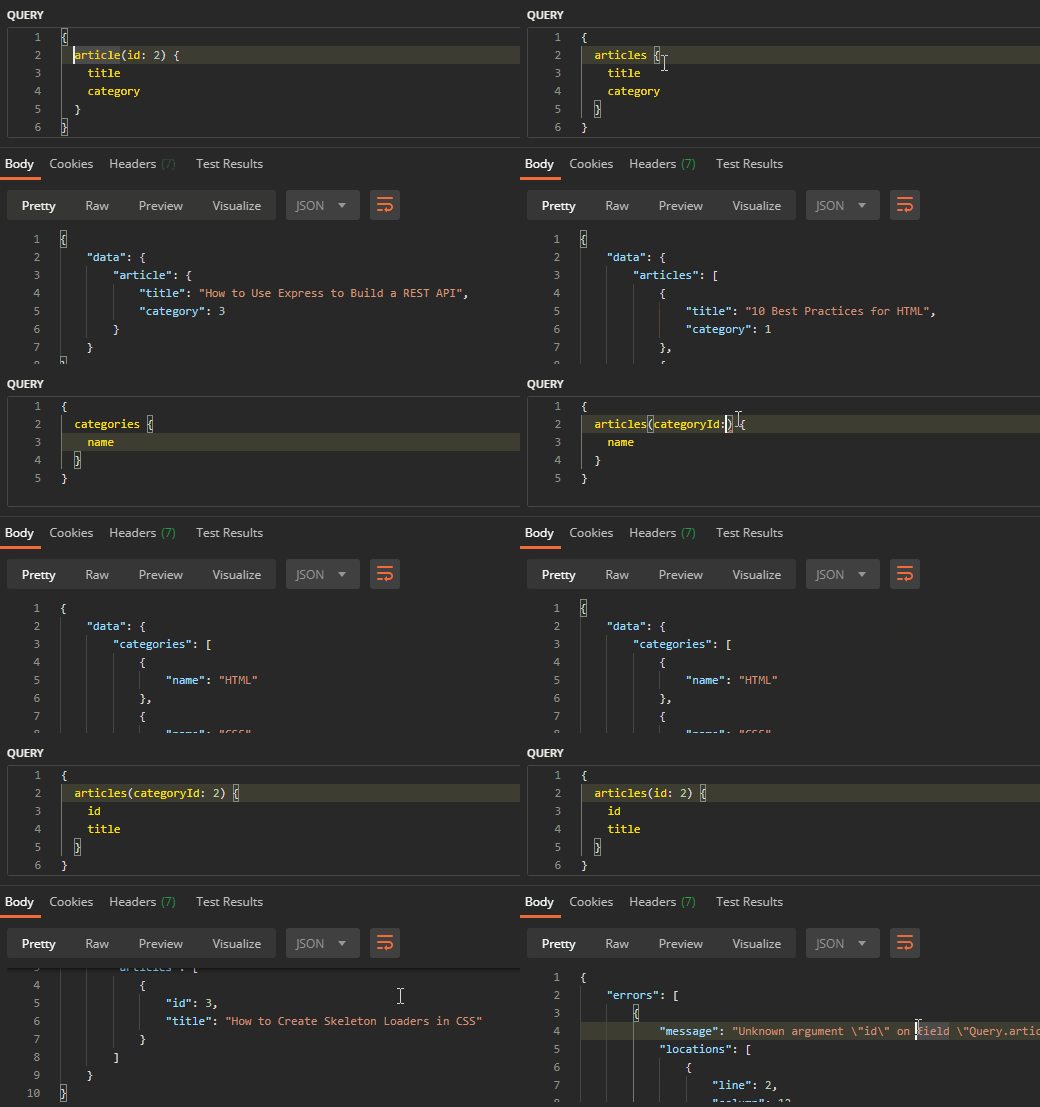
For testing, you can use graphiql as it is enabled, but to see a more real-world example, let’s see how you would send GET requests to the endpoint, using Postman. If you haven’t installed Postman yet, make sure you do it, and create a new GET request to http://localhost:3000/graphql. Make sure you also set the body to GraphQL, and let’s try to query a single article with a title and an article.
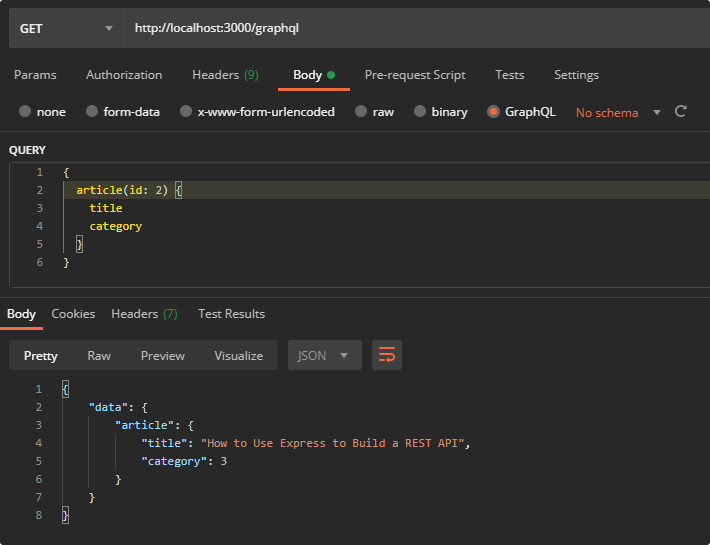
And sure enough, we get back the expected data. If you only need the title, you can remove the field from the query, and there are no changes required to the backend API.

Conclusion
Using this structure, you can clearly separate types and resolvers from each other (as well as different types and resolvers from one another), and make your API more scalable. However, do note there is no definitive project structure. Move things around, until they feel right, and use a project structure that you feel comfortable with.
If you would like to get the code of this project in one piece, you can clone it from the GitHub repository. There is an addition to the API to enhance single article entities, so make sure you check it out.
Have you used GraphQL before? Let us know your thoughts about it in the comments section down below! Thank you for reading through, happy coding!


Rocket Launch Your Career
Speed up your learning progress with our mentorship program. Join as a mentee to unlock the full potential of Webtips and get a personalized learning experience by experts to master the following frontend technologies:


